
This tutorial I will show you how to create links in your image. I'm shore there's a lot of different ways you can do this, but I'll just show you how to do it real easy.
1) After creating the image you want to add links to in photoshop, make shore the mode is set to RGB Color. Just go to Image -> Mode -> RGB Color.
2) Go to File -> Jump To -> Adobe ImageReady. Your image will now load into ImageReady.
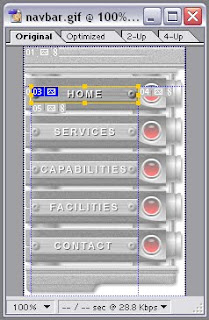
For this tutorial I will be using this image that I found:
1) After creating the image you want to add links to in photoshop, make shore the mode is set to RGB Color. Just go to Image -> Mode -> RGB Color.
2) Go to File -> Jump To -> Adobe ImageReady. Your image will now load into ImageReady.
For this tutorial I will be using this image that I found:

I will make the buttons of this navigation bar into links.
3) Press K to select the slice tool in ImageReady.
4) Use the slice tool to create a square shaped slice where you want the link in your image. I created a slice around the first button in my image like this:
3) Press K to select the slice tool in ImageReady.
4) Use the slice tool to create a square shaped slice where you want the link in your image. I created a slice around the first button in my image like this:

5) Double click your slice to make this box appear. Use your own settings to create the link you want.


Now you have made a link in your image!
6) Repeat step 4 and 5 everywhere you want a link to appear in your image.
7) When you've finished creating links, you simply go to File -> Save Optimized As... Save your image as HTML and Images.
That's all! The whole thing is saved as a html document, so all you need to do is include that html wherever you want your linking image to appear on your site.
Hope someone can make use of this. It's not at all hard once you know how to do it .


1 comments:
I am creating an e store and will feature a handful of designer brands. Can I create links to the designer?
Thank-you
Silver MLM
Post a Comment